Affordable Graduate Student Gifting Ideas

Looking for a meaningful yet cost-effective way to show your appreciation for someone? Look no further! Whether you need a birthday gift for a friend, a thank you for your mentor, or even just a pick-me-up for your roommate, there are many ways to show that you care without breaking the bank. Here are three of my personal favorites.
Hot Chocolate Kit
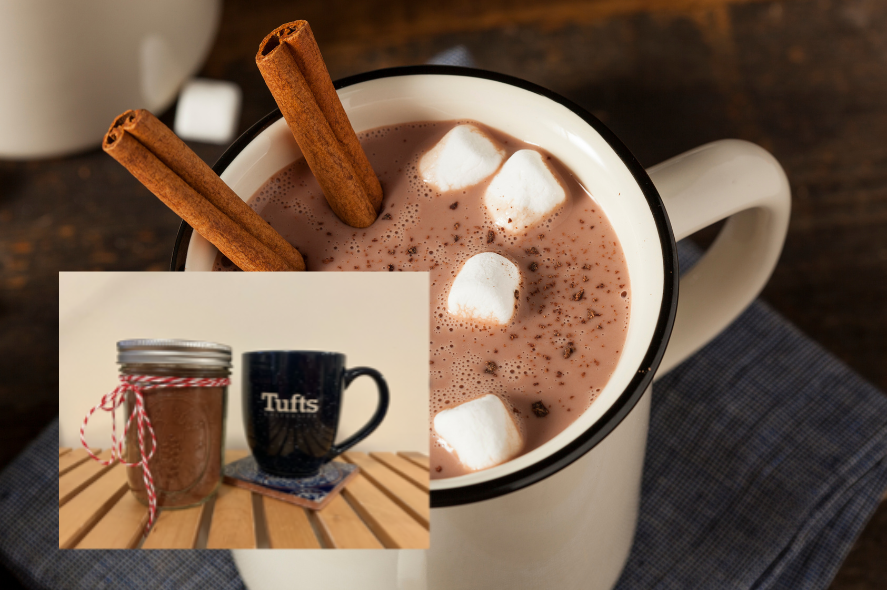
This gift is quick, easy to make, and perfect for a cozy night in. It’s also naturally gluten & dairy free, so it’s a great option for a friend with allergies. Pair it with a mug from the Tufts bookstore or a fun snack if you’d like!
What You’ll Need:
- ⅔ cup 100% Dutch cocoa ($5 at most grocery stores)
- 1 ⅓ cup sugar
- ¼ tsp cayenne pepper
- A pinch of salt
- A container with a lid (I recommend a mason jar)
- Mini marshmallows (optional)
How to Make:
- Combine the cocoa, sugar, cayenne pepper, and salt in a bowl. Mix well.
- Pour your mixture into a mason jar. Scatter a handful of mini marshmallows on top if you’d like.
- Screw the lid on tight, and wrap with a colorful ribbon for extra flair.
Custom Bookmark

I love this gift for how personalized you can make it to the recipient. Use acrylic paint to decorate a wooden bookmark with your friend’s initials, the spine of their favorite novel, or any design of your choosing. This gift goes well with a preloved book from your local bookstore. I recommend More Than Words--they have an excellent selection of used books, and your purchase supports their mission of empowering system-involved youth.
Note: Check out the Crafts Center at Tufts for free access to art supplies!
What You’ll Need:
- Wooden bookmarks (packs are sold by Walmart or Amazon for as low as $6)
- Acrylic paint or wood stain
- String of your choosing (I like embroidery thread, but most yarns or strings will work)
- Mod podge or other varnish (optional; this protects your paint and gives the bookmark some extra shine)
How to Make:
- Paint both sides of your bookmark and allow it to dry.
- If you’d like, coat the bookmark with mod podge or other varnish. Allow it to dry.
- Thread string through the hole at the top, if there is one. You can braid it, add beads, or even follow this tutorial to make a tassel.
Block Printed Bandana or Tote Bag
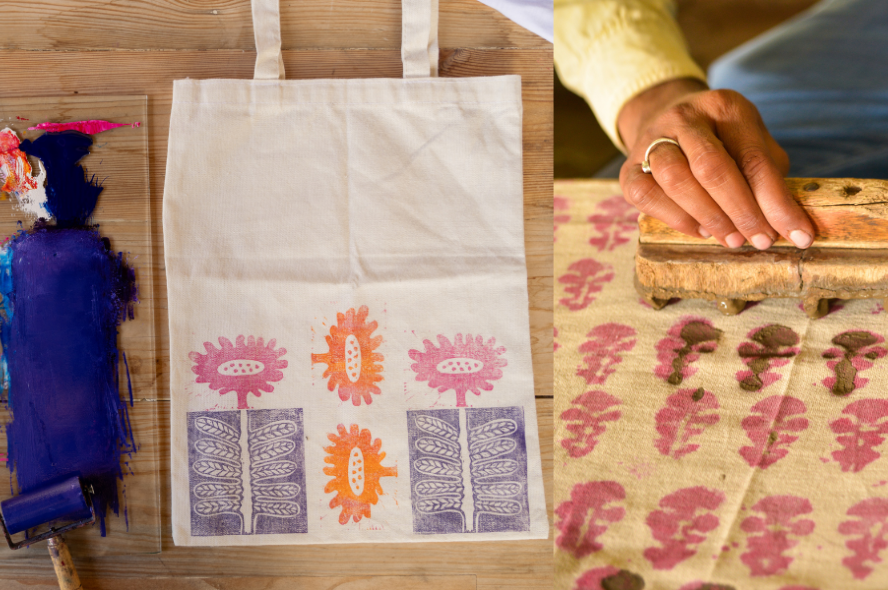
This gift idea opens a world of customization opportunities. You can print easily on just about any fabric product, whether it be a tote bag, a bandana, t-shirt, or even a pillow case. Both pre-dyed fabrics and fabric dye are available for very reasonable prices. Lastly, your options for stamps are nearly unlimited--if the craft store doesn’t have the design you’re looking for, you can create your own by cutting out shapes from foam or rubber blocks! A block printed gift is the perfect blend of art and utility, making it a wonderful and practical gift.
What You’ll Need:
- Cotton bandana ($2) or tote bag ($2)
- RIT Fabric Dye ($5) (optional, if you’d like to dye the fabric yourself--just be sure to get the correct variety for the type of fabric you’re using!)
- Fabric paint ($6) (acrylic paint will also work if heat set; both will hold up when washed)
- Sponge
- Stamps (can be rubber, wooden, or even foam)
How to Make:
- Lay the material you’ve chosen to print on a thick piece of cardboard. This will protect your floor or table from paint stains. You may also wish to secure the edges of the material to the cardboard with clips or heavy items to prevent it from shifting while you print. If you are printing a bag, t-shirt, or any item with two sides, place another piece of cardboard between the two sides to prevent your design from bleeding through.
- Pour your paint on a flat surface (such as a paper plate or bit of cardboard). Dab your sponge into the paint until the paint soaks through it evenly. This will serve as an inkpad. Keep your sponge paint-side-up on a protected surface.
- Press your first stamp into the sponge ink pad until the color of the paint evenly coats the surface of the stamp. Check to make sure you don’t have any globs of paint on your stamp, as this will blur the lines of the print you create.
- I recommend testing the stamp on a bit of scrap cardboard or fabric before printing on your project. When you’re ready, press the stamp into your fabric surface. Press firmly and evenly across the top of the stamp to transfer all paint to your fabric.
- Peel off your stamp and admire your print! Continue printing in this manner until you’ve completed your design.
- Allow to dry for 24 hours, or however long is recommended by the brand of paint you used. Avoid washing the fabric for at least one week.
- If you chose to use acrylic paint, wait until the fabric has dried completely, and then toss it in the dryer for an hour. This will help set the paint so that it does not come off when washed.
- Enjoy gifting your final product!